We have Installed OpenSSH on Linux Ubuntu, now let’s install OpenSSH on Windows 10.
Installing OpenSSH
We can use the following choco command to install OpenSSH, see Installing Chocolatey on Windows 10 for a quick Chocolatey setup.
We can use the snippet below to install OpenSSH with Chocolatey
choco install openssh
The choco command will download the OpenSSH package to ‘C:\ProgramData\chocolatey\lib’ by default. The Choco command will also execute it’s chocolateyinstall.ps1 script which will in turn install OpenSSH to ‘C:\Program Files\OpenSSH-Win64’. Here we can locate the install-sshd.ps1.
We can use the snippet below to execute the install.sshd.ps1
. "C:\Program Files\OpenSSH-Win64\install-sshd.ps1"
OpenSSH requires host keys and access to those hosts private keys.
We can use the snippet below to generate all the ‘host’ keys needed by sshd
. "C:\Program Files\OpenSSH-Win64\ssh-keygen.exe" -A
We can use the snippet below to grant the ‘NT Service\sshd’ read access to the host private key files
   Get-ChildItem -Path 'C:\Program Files\OpenSSH\ssh_host_*_key' | % {
	   $acl = get-acl $_.FullName
	   $ar = New-Object  System.Security.AccessControl.FileSystemAccessRule("NT Service\sshd", "Read", "Allow")
	   $acl.SetAccessRule($ar)
	   Set-Acl $_.FullName $acl
	}
We will also need to open port 22 in the firewall for inbound traffic for SSH.
We can use the snippet below to generate all the ‘host’ keys needed by sshd
New-NetFirewallRule -Protocol TCP -LocalPort 22 -Direction Inbound -Action Allow -DisplayName SSH
We will need this service running after a reboot, so let’s set the SSHD and the SSH-Agent service to auto-start mode.
We can use the snippet below to set both services to autostart
Set-Service SSHD -StartupType Automatic
Set-Service SSH-Agent -StartupType Automatic
Now that we have OpenSSH installed let’s configure the sshd_config file.
We can use the snippet below to modify the Password Authentication and add the Powershell Subsystem.
$FilePath = "C:\Program Files\OpenSSH-Win64\sshd_config"
$FileData = (Get-Content $FilePath).Replace('#PasswordAuthentication yes','PasswordAuthentication yes')
$FileData += 'Subsystem	powershell C:\Program Files\PowerShell\6.0.0-alpha.18\powershell.exe -sshs -NoLogo -NoProfile'
$FileData | Out-File $FilePath -Force
Finally for these configurations to take affect we need to restart the SSHD Service.
We can use the snippet below to restart the SSHD Service.
Restart-Service sshd
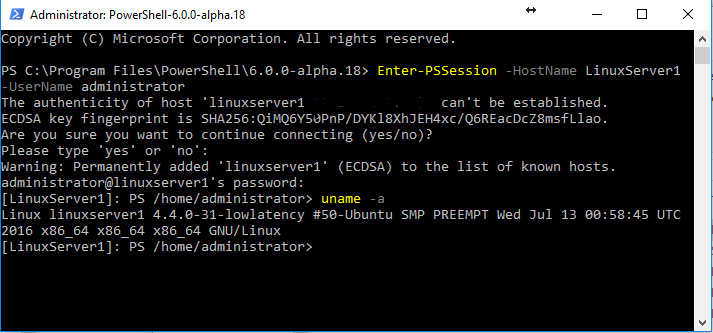
Now that we have a OpenSSH configured let’s use it to connect to our Linux Server via Powershell Remoting.
We can use the snippet below to remote to our Linux Server
Enter-PSSession -HostName $LinuxServerIP -UserName administrator
Results
Credit
- PowerShell Documentation: Powershell Remoting Over SSH
- PowerShell Documentation: Install Win32 OpenSSH