Installing OpenSSH
In two of my earlier posts we created a Linux VM and installed Powershell on Linux, now let’s install OpenSSH and start remoting. OpenSSH is a freely available version of the Secure Shell (SSH) protocol family of tools for remotely controlling, or transferring files between, computers.
We can use the snippet below to install OpenSSH in the terminal
sudo apt install openssh-client
sudo apt install openssh-server
We will need to edit the sshd_config file to enable password authentication and add a PowerShell subsystem enrty.
We can use the snippet below to edit the sshd_config file in the terminal
sudo nano /etc/ssh/sshd_config
We will need to uncomment the following in the sshd_config file.
PasswordAuthentication yes
We will also need to add the following:
Subsystem powershell powershell -sshs -NoLogo -NoProfile
Exit nano.
CTRL+X
Save the sshd_config file and restart SSH.
We can use the following command to restart the sshd service in the terminal
sudo systemctl restart sshd.service
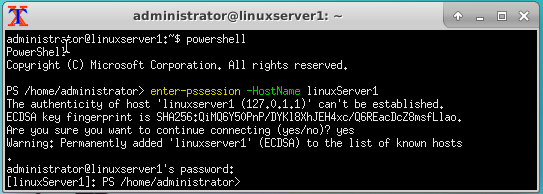
Now we should be able to create a remote session from our Linux server to itself
We can use the following command to start Powershell
Powershell
We can use the following command to remote to our Linux server
Enter-PSSession -HostName $VMName
Results
Credit
- PowerShell Documentation: Powershell Remoting Over SSH